If this is the first email account you're adding to Mac Mail, the program will automatically start you from "Step One - Add Account:"
1. Start the Mail application on your Mac
If the Welcome to Mail window does not display, select Add Account from the File menu.
2. Click the “Mail” menu for the application, then select “Preferences…” (Keyboard shortcut CMD + ,)
4. Click the plus icon ( + ) in the bottom left to add a new POP account, then fill out the fields in each screen as follows:
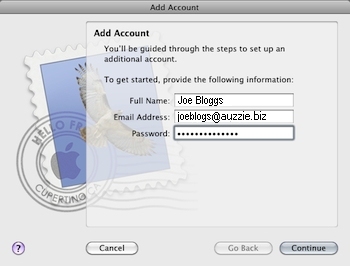
Step one – Add Account:
• Full Name – the name you want to associate with the e-mail address. It is what people who receive your e-mails will see as who sent the mail.
• Email Address – the e-mail address that you are going to be using (e.g. myname@auzzie.biz)
• Password – Enter your password. Please note the password is case sensitive.
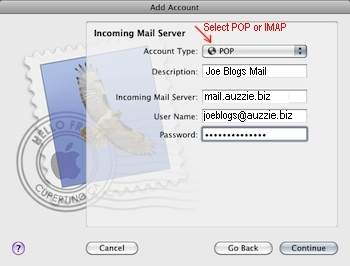
Step two - Incoming mail server
• Account Type – leave this as POP or IMAP.
• Description – this description is for your reference, and can be left blank.
• Incoming mail server – eg: mail.auzzie.biz
• User name – eg: myname@auzzie.biz.
• Password – enter your password again here.
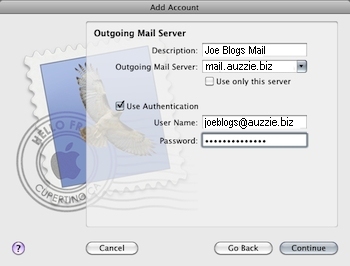
Step three – Outgoing Mail Server
• Description - this description is for your reference, and can be left blank.
• Outgoing Mail Server – eg: mail.auzzie.biz
• Retype your Username and Password if prompted again
Your mail account is now ready for use. Click on the “Get all new mail” option at the top to check your mail.
Troubleshooting:
Sometimes the SSL settings could be playing up, therefore you may need to change the SSL settings.Also if you have trouble sending email, check you have the correct Outgoing Mail Server (SMTP) Port: 587. If you are not sure please submit a Support Ticket.
1. From the Mail menu, select Preferences.
2. Click Accounts.
3. In the Accounts list, select the email account you want to use.
4. From the Outgoing Mail Server (SMTP) drop-down menu, select Edit Server List.
5. Click Advanced. Check the Outgoing Mail Server (SMTP) Port: 587
6. Untick Use SSL.


